Troubleshooting
Below, you will find a comprehensive list of common issues users may encounter, accompanied by solutions to resolve them.
If you remain unable to resolve the issue after following these steps, navigate to the Help menu and select Open Logs, then retain the relevant log files when seeking further assistance.
How to access the logs in Marker Data?
To access the logs for Marker Data, navigate to the Help menu and select Open Logs.
This opens the Logs folder in Finder. Depending on the operation you were performing, you may find:
csv2notion-neo_log.txt— Notion upload activityairlift_log.txt— Airtable and Dropbox upload activity
Info
These files may include project, folder, or database names from your machine. Share them only if you are comfortable doing so when requesting support.
macOS will not open Marker Data / Gatekeeper warning
Marker Data is code-signed and notarised by Apple. Please download it only from the official GitHub Releases page.
If macOS reports that the application cannot be opened, locate Marker Data in Finder, right-click (or Control-click) the application, choose Open, then confirm Open in the dialogue. Thereafter, subsequent launches should proceed normally.
For further information on distribution and security, please refer to the FAQ.
Empty or invalid export destination / Export Folder shows “Please select!” or “Missing Folder!”
Marker Data cannot extract until a valid export destination has been selected.
You will see this when:
- The Extract footer shows
Please select!next to the export folder control - The footer shows
Missing Folder!because a previously chosen destination can no longer be found (for example the drive was ejected, or the folder was moved or deleted) - Extraction fails with a message indicating that the Export Folder is not selected
On Extract, use the folder control in the footer, or open General Settings → File and choose a destination under Export Destination. Select a folder you can write to (for example on your Mac, an external drive, or a mounted network volume). Confirm the footer displays the folder name rather than a warning, then provide your project again.
Right-click the folder control and choose Clear Path if you need to remove an old selection first, then choose a folder again.
The extraction or upload fails with an alert
When an extraction or upload does not finish successfully, Marker Data may show messages such as Failed to complete extraction or Failed to complete upload.
- Press
Show Error Detailson the alert, or - Press
Show Error Detailsin the progress area on Extract
This opens the Failed Tasks window with the file path and the error message for each failure. Hover a truncated cell to see the full text. Use that message when searching this page or when contacting support.
Install Location Warning
macOS may show Install Location Warning if Marker Data is not running from the Applications folder.
Move the application into /Applications, then launch it again. Choose Don't show again only if you intentionally run it from another location and accept that the Workflow Extension and related handoffs may not function correctly.
Share Destination is not listed / Automation Access
If Marker Data's Share Destinations do not appear in Final Cut Pro:
- Confirm Marker Data is installed in
/Applications. - In Marker Data, choose
File→Install FCP Share Destination…, or pressInstallon the Extract card when prompted. - Quit and reopen Final Cut Pro, then review Share Destinations again.
When you first send a timeline via Marker Data Source or Marker Data H.264, macOS may ask you to allow automation access so that Final Cut Pro may interact with Marker Data. This permission must be granted for the Share Destination integration to function properly.
Info
Users who have both Final Cut Pro (Lifetime / Perpetual) and Final Cut Pro Creator Studio installed simultaneously may encounter conflicts during Share Destination installation. It is strongly recommended that only a single version of Final Cut Pro be maintained on the system at any one time. See the FAQ.
For installation steps, please refer to the Share Destination documentation.
Marker Data's Workflow Extension is not functioning
To ensure optimal functionality of Marker Data, please ensure it is installed within the Applications folder.
The Workflow Extension opens Marker Data from /Applications/Marker Data.app. If the application resides elsewhere, handoff from Final Cut Pro may fail.
Workflow Extension does not appear under Extensions
In Final Cut Pro, the Extensions button on the left side of the toolbar appears only when extension apps are installed. If you do not see Marker Data:
- Confirm Marker Data is in
/Applicationsand has been launched at least once. - Quit and reopen Final Cut Pro.
- Confirm you are using a supported Final Cut Pro release (see the Welcome page for system requirements).
See also
Roles tab appears empty or out of sync
The Roles tables remain empty until you drop an .fcpxml / .fcpxmld file or a Final Cut Pro project onto the Roles tab (in the main application or the Workflow Extension). After roles are retrieved, enable or disable them as required.
The Workflow Extension Roles tab remains synchronised with General Settings → Roles. On large or complex projects, synchronisation may lag — press Refresh in the Workflow Extension to force an update. Use Update Active Configuration if you wish to preserve role selections for subsequent extractions.
Why are there no images in the extract folder?
Please ensure that you are using Marker Data's Share Destination. Images will not be extracted when using Marker Data's Workflow Extension.
If you have enabled Skip Image Generation under Image settings, stills and GIFs will not be produced by design.
Images or attachments are missing in Notion or Airtable after upload
If the upload appears to complete, yet images or attachments are absent in the database:
- Confirm you did not extract via the Workflow Extension alone when you expected stills — use the Share Destination for image extraction
- Confirm
Skip Image Generationis disabled under Image settings - Confirm you selected a Notion or Airtable upload profile (not solely a No Upload or extract-only profile) when you intended an immediate upload
- For Airtable, confirm Dropbox authorisation completed successfully and that attachment columns such as
AttachmentsandPalette Attachmentsexist in your table — see Dropbox Prerequisite and Creating Airtable Database Profile
Review the most recent entries in csv2notion-neo_log.txt or airlift_log.txt via Help → Open Logs.
Drag and drop from Final Cut Pro does not start an extraction
Set a valid
You may also:
- Use Marker Data's Share Destination for metadata and images
- Use the Workflow Extension Extract tab to open Marker Data with marker metadata
- Use
Choose File/File → Open…with an.fcpxmlor.fcpxmldfile exported from Final Cut Pro
Finder text clippings are accepted only when they contain FCPXML content.
Fewer markers appear in the extract than I expected
Marker Data extracts markers from the primary active timeline. Markers nested within Compound Clips, Multicam clips, or synchronised clips outside that primary timeline are disregarded. Markers obscured by trimmed clips are likewise excluded under a WYSIWYG approach.
Where Marker IDs would otherwise collide, Marker Data appends a numerical suffix so that each Marker ID and image filename remains unique.
For a fuller explanation, please refer to the FAQ on nested markers, obscured markers, and marker collision.
Extraction fails when Naming Mode is set to Notes
An error occurs during extraction when Naming Mode is configured to Notes whilst Marker Source is set to Marker and Captions or Captions. These combinations are incompatible.
Under Image settings, either change Naming Mode away from Notes, or set Marker Source to Markers only, then try again.
Roles tables are empty on launch
The Roles panel stays empty until you load an FCPXML project. Drop an .fcpxml or .fcpxmld file onto Roles or Extract, drag a timeline from Final Cut Pro, or use File → Open…. Wait until roles appear, then enable or disable them before extracting.
By default, Marker Data extracts all roles. Disabled roles are omitted from the extraction. Remember to Update Active Configuration if you wish those selections to persist.
Colour swatch is missing from my extract
If colour swatches do not appear:
- Confirm
Enable Swatchis turned on under Image → Swatch - Confirm images were actually extracted (Share Destination;
Skip Image Generationoff) - Swatch embedding is not supported for the Excel extract profile
- When using GIF with Notion or Airtable profiles, palettes are written as separate
.jpgfiles (for example alongsidePalette Filenamein the manifest), rather than merged onto the GIF itself
My extract folders do not appear in Queue
Queue lists folders that contain an extract_info.json file. That sidecar is written for Notion and Airtable extract profiles (including the No Upload variants).
Pure CSV, TSV, Excel, MIDI, Markdown, and similar extract-only profiles do not appear in Queue. Use a Notion or Airtable profile when you intend to upload later from Queue.
You may also drag extract folders into Queue, or press Load from Export Destination when automatic scanning is enabled.
Queue does nothing when I press Start Upload
For each Data Set listed in Queue, assign a Database Profile under the Upload Destination column before pressing Start Upload. Rows without a destination are skipped.
Confirm the selected profiles match the platform of each extract (Notion profiles for Notion extracts, Airtable profiles for Airtable extracts).
Experiencing slow uploads in Notion
Notion enforces variable rate limits on its API, averaging approximately three requests per second. While brief bursts above this average may occasionally be permitted, they are not guaranteed and should not be relied upon. It is important to note that Notion’s rate limits are subject to change without notice, and we do not have control over these adjustments.
As usage approaches the rate limit, upload performance may gradually degrade, resulting in slower response times. To prevent this and avoid errors such as 500 Server Error or HTTP 429 (Too Many Requests), users are strongly advised not to upload a large Data Set (e.g. 99 images) in a single batch.
Instead, we recommend uploading data in smaller batches of up to 50 items, followed by a short pause before initiating the next batch. This approach helps maintain consistent performance and minimises the risk of triggering rate-limiting errors. For larger projects, extract with Notion (No Upload) and upload in batches via Queue.
For the most up-to-date information on Notion’s rate limits, please refer to their official documentation.
The slow upload speed could also be attributed to potential issues with Notion's servers or regional server connectivity. Please verify the current status of Notion's servers.
Experiencing slow uploads in Airtable
Airtable upload speed depends on your network connection, the size and number of attachments, and Dropbox availability (attachments are staged via Dropbox before Airtable receives them). Large batches with many stills or GIFs will naturally take longer.
If uploads suddenly stall or fail, check Airtable’s status and Dropbox’s status. For larger projects, extract with Airtable (No Upload) and upload in batches via Queue.
Marker Data shows Failed to complete upload
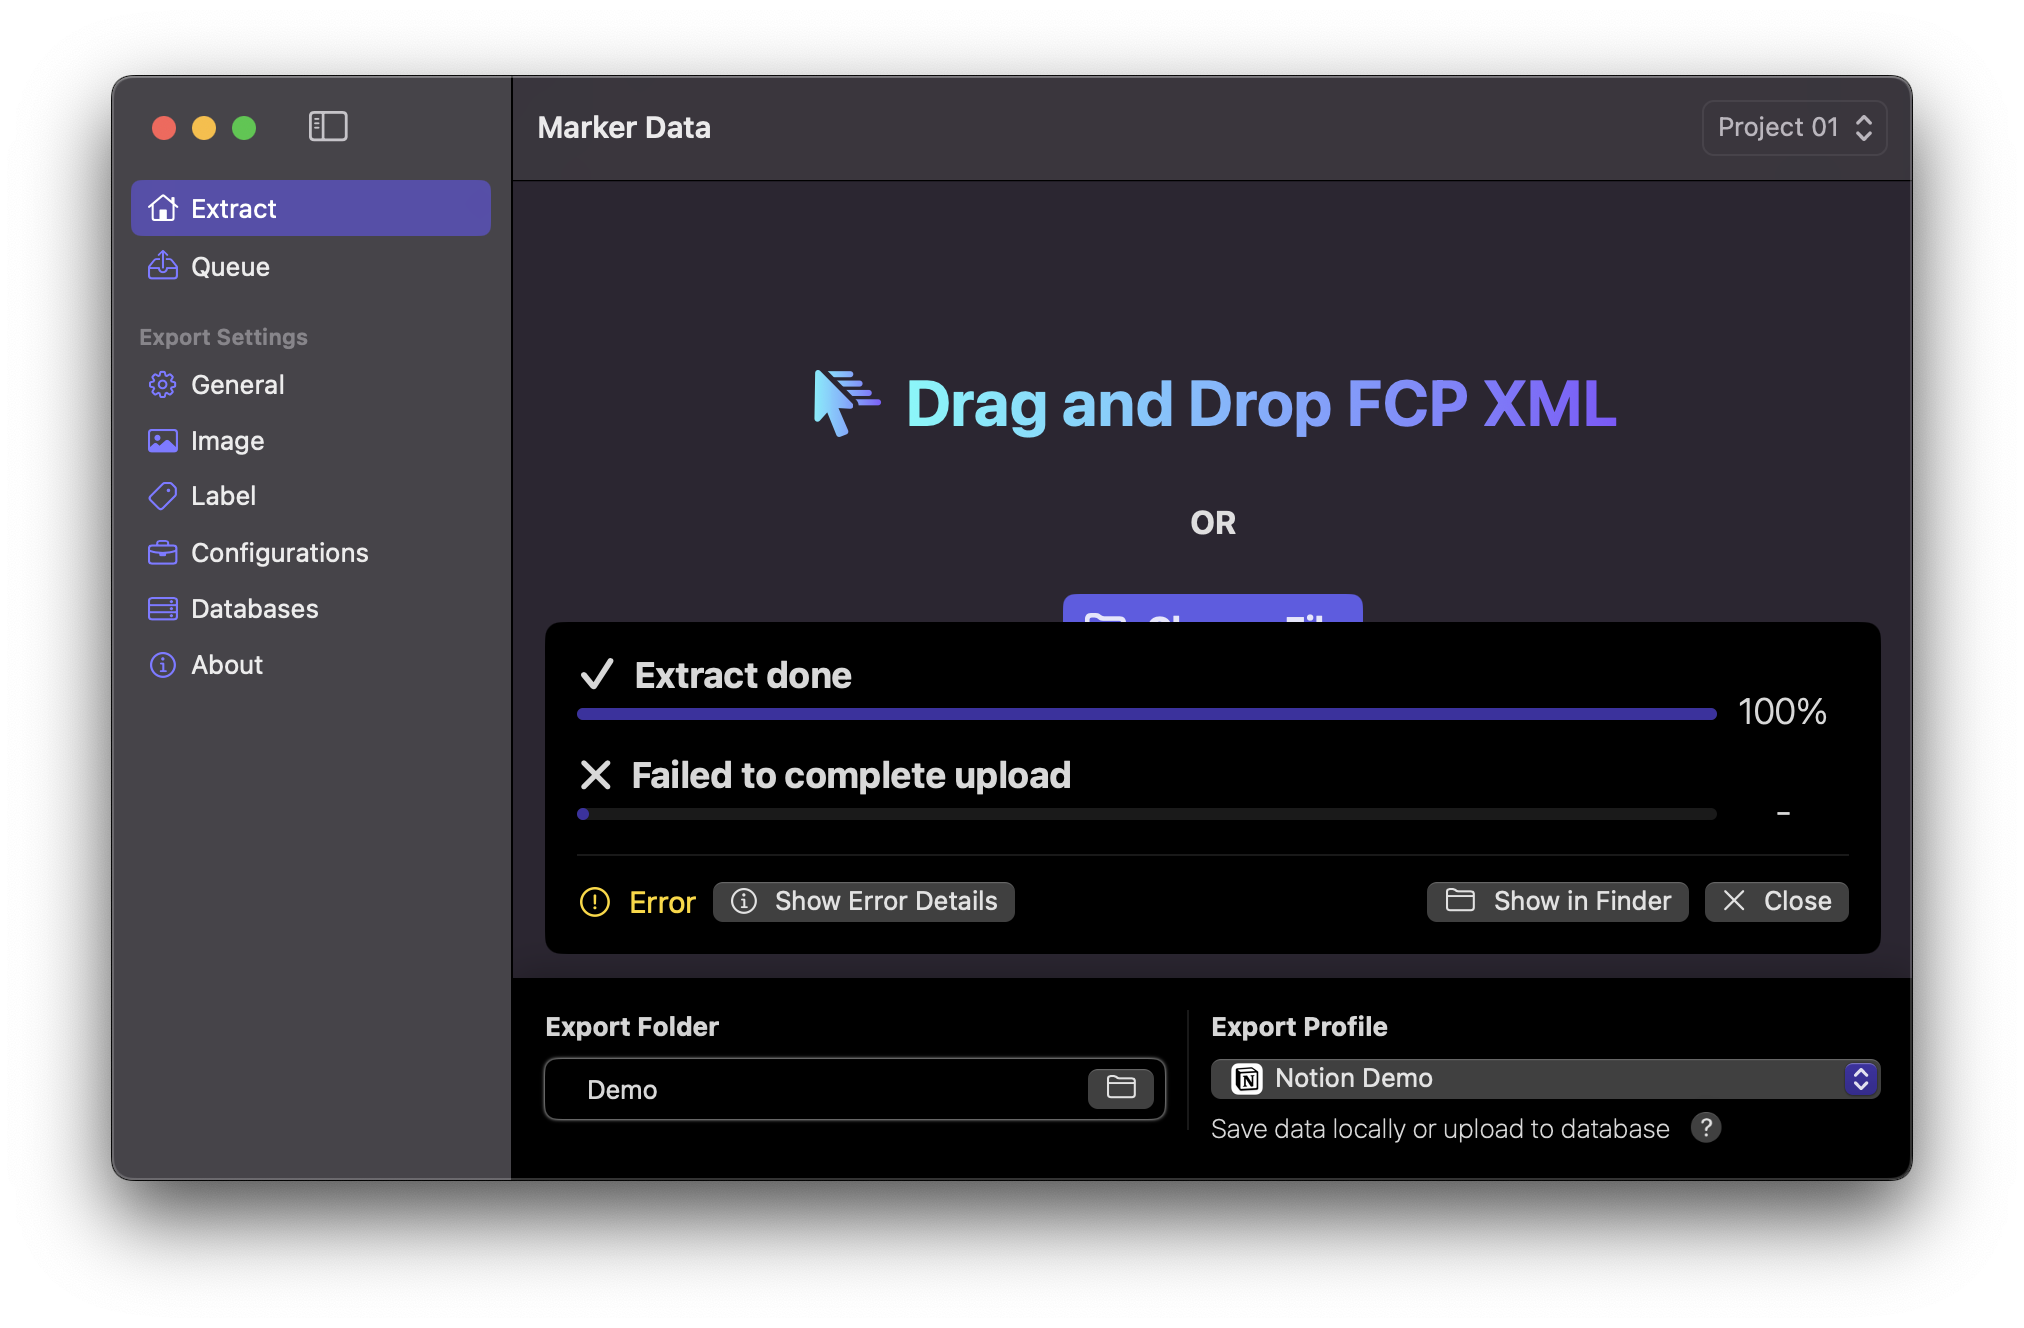
When Marker Data displays a Failed to complete upload error, it may be attributed to various underlying causes. If you are utilising a firewall application such as Little Snitch, please ensure that outgoing connections for Marker Data are permitted.
Notion
If you encounter issues uploading to your Notion Database, please follow these steps to troubleshoot:
- Navigate to the
Helpmenu and selectOpen Logs. - Open the log file
csv2notion-neo_log.txt. - Scroll down to review the most recent entries.
If you observe error messages such as HTTPError: 401 Client Error: Unauthorized for url or Invalid Notion token, it is likely that either your Notion Database URL is incorrect or your Notion Integration Token is incorrect. For detailed instructions on resolving these issues, please refer to the Notion Prerequisite documentation.
Confirm that the Notion integration is connected to the destination database (Connections), and that the key column used for merging (typically Marker ID, or your renamed title column) exists as a Title property.
Airtable
If you encounter issues uploading to your Airtable Database, please follow these steps to troubleshoot:
- Navigate to the
Helpmenu and selectOpen Logs. - Open the log file
airlift_log.txt. - Scroll down to review the most recent entries.
If you observe the error messages Authentication required or Invalid permissions, or the requested model was not found., it is likely that either your Airtable Token is incorrect or your Airtable Base ID and Table ID are incorrect. For detailed instructions on resolving these issues, please refer to the Airtable Prerequisite documentation.
If you observe an error indicating that Dropbox does not have the required scope files.content.write (or related file permissions), it is likely that the required scopes for the app have not been enabled using the Permissions tab within Dropbox’s App Console. For detailed instructions, please refer to the Dropbox Prerequisite documentation. After you have checked and submitted the scopes, you must recreate your Dropbox refresh token. For detailed instructions, please refer to the Creating Airtable Database Profile documentation.
Marker Data shows Failed to upload completely
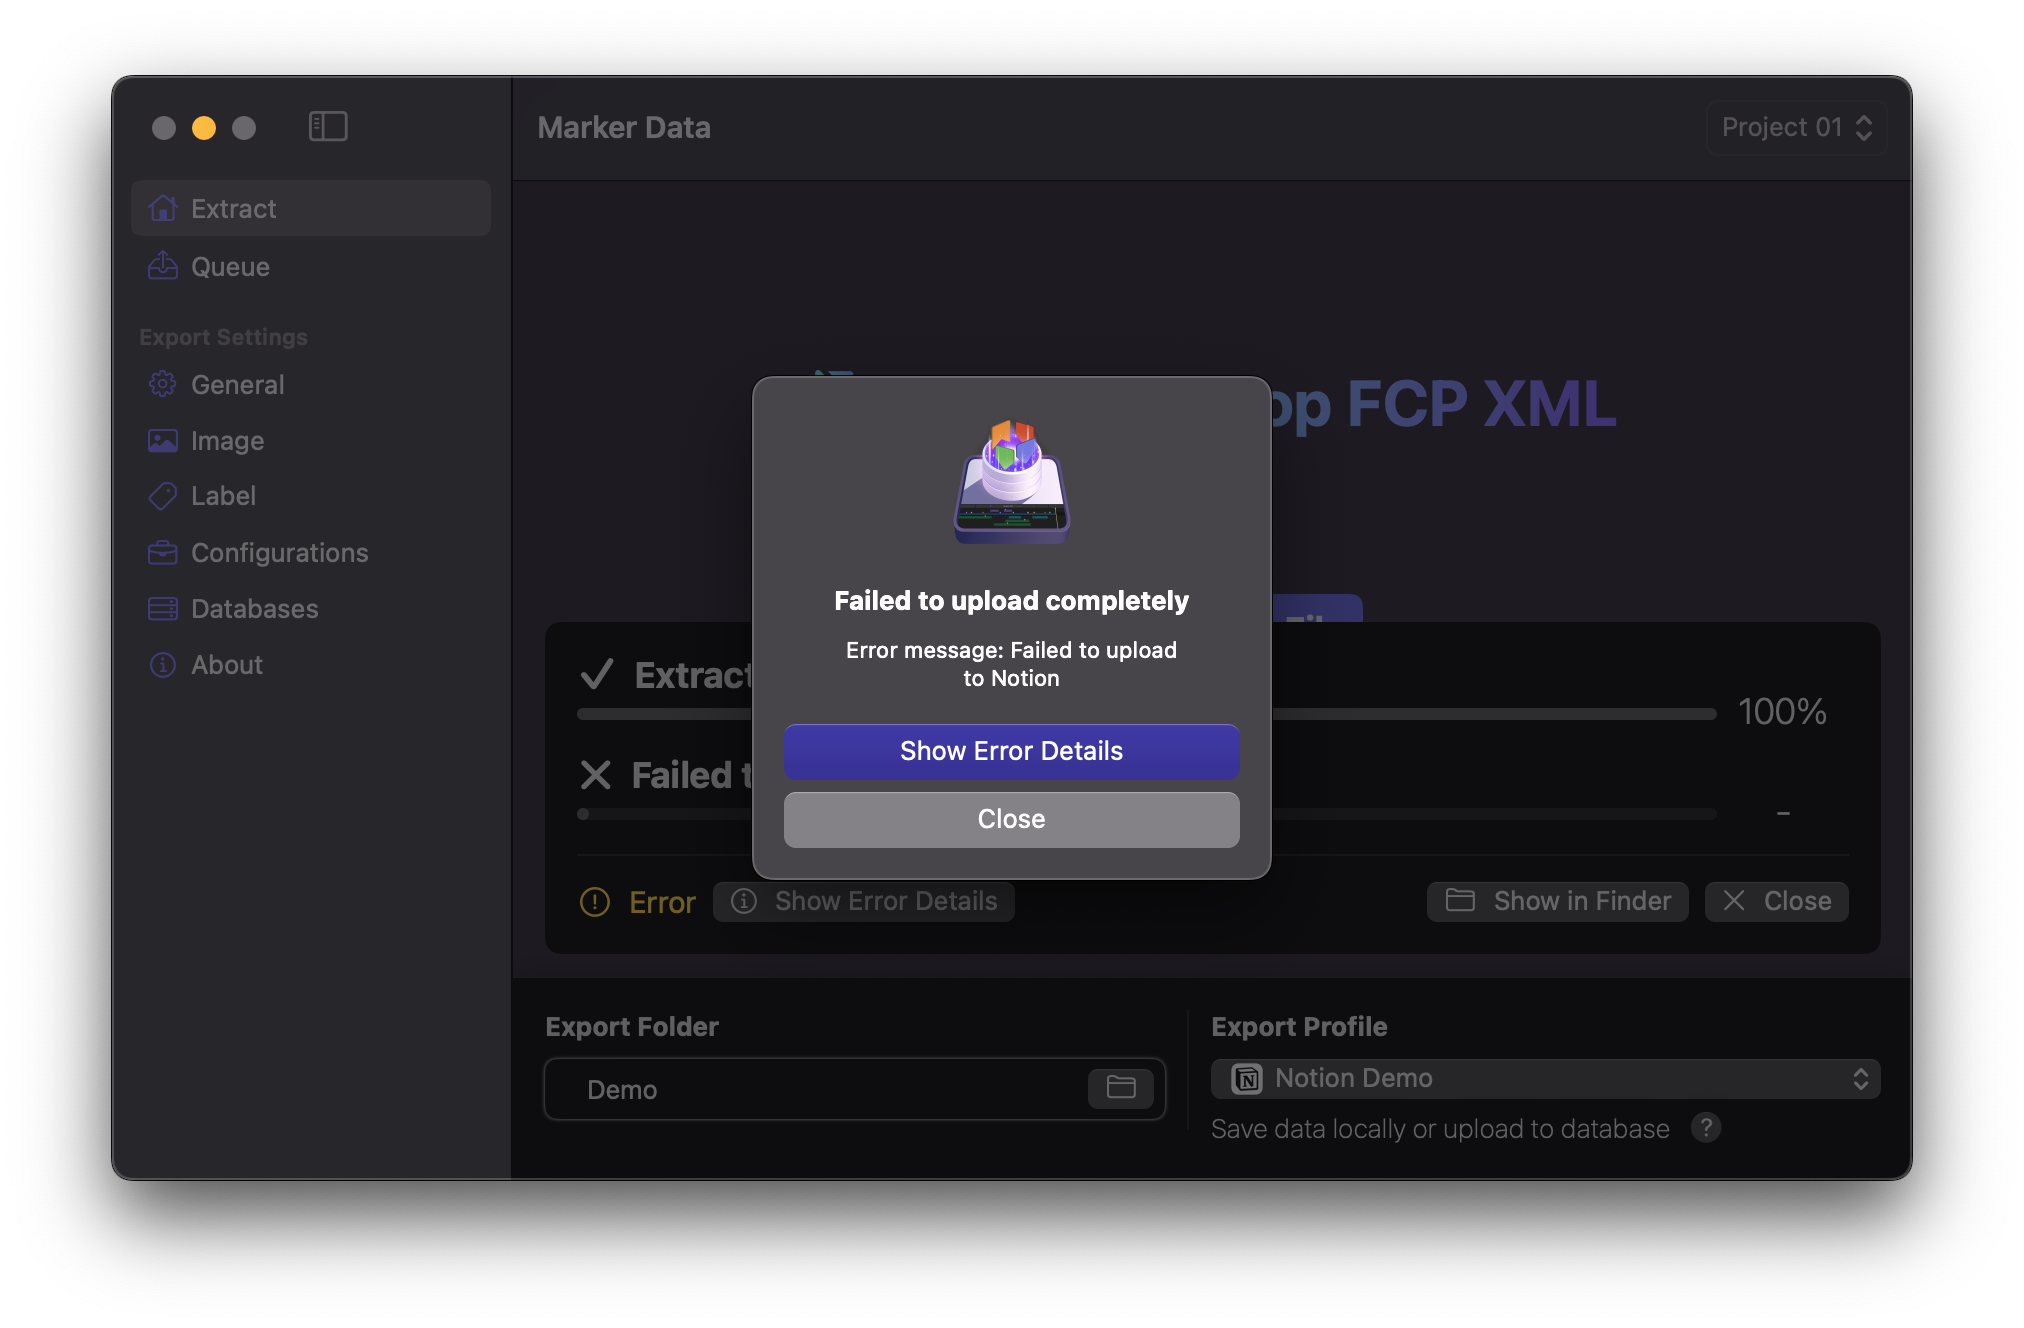
When Marker Data displays a Failed to upload completely error, it may be due to a couple of factors. One potential cause is that you are using an Intel-based Mac, which is not supported by Marker Data. Starting with Marker Data version 1.1.0, the application is exclusively built and optimised for Apple Silicon only. For further information, please refer to this FAQ.
If you are utilising a firewall application such as Little Snitch, please ensure that outgoing connections for Marker Data are permitted.
Uploads fail or appear incomplete on free Notion or Airtable plans
Marker Data itself does not restrict usage of Notion or Airtable free plans. However, those platforms impose their own limits. Notably, Notion’s free plan restricts uploads to a maximum of approximately 5MB per file, whilst Airtable’s free plan limits bases to 1,000 records.
Large GIFs, high-resolution stills, or very large Data Sets may therefore fail or appear incomplete when those plan limits are reached. Reduce image size or batch size, upgrade the destination plan if appropriate, or consult the FAQ.
Rename Key Column errors when merging
By default, Marker Data uses Marker ID as the key column. If you rename the key column in your Notion or Airtable database, the value entered under Rename Key Column in the Database Profile must match that column’s name exactly.
Do not enter Marker ID into the Rename Key Column field — that name is reserved for the default key and cannot be used there.
For Notion, the key column must be a Title property. A mismatch between the profile and the live database schema commonly causes merge or upload failures. See Creating Notion Database Profile and Creating Airtable Database Profile.
Dropbox authorisation in Terminal does not complete
When creating or refreshing an Airtable Database Profile, Marker Data launches Terminal so that you may authorise Dropbox:
- Ensure you are already logged into your Dropbox account in a browser.
- Complete the Dropbox Prerequisite scopes and App Key steps before continuing.
- When Terminal displays the authorisation URL, open it, click
Allow, copy the authorisation code, paste it into Terminal, and press Enter. - Wait until
Doneappears, then return to Marker Data — the profile should showDropbox configured.
If authorisation was interrupted, or if you later changed Dropbox app scopes, recreate the refresh token from the Airtable Database Profile sheet. macOS may also prompt for permission to control Terminal — allow this under System Settings → Privacy & Security when asked.
See Creating Airtable Database Profile.
Final Cut Pro crashes during extraction when the timeline includes Metaburner’s Title
Metaburner’s Title is a highly complex title effect, leading to an intricate FCPXML structure. This complexity is the primary reason Final Cut Pro encounters stability issues during the extraction process. Although image extraction may be feasible on basic timelines using Metaburner’s Title, Marker Data does not account for Metaburner’s Title, as we do not support third-party custom titles for parsing. It is best to avoid placing Markers on Metaburner’s Title.
If you need to burn Metaburner’s Title into your clips for image extraction via Marker Data, a simple solution is to pre-render the timeline. To do this, render the timeline containing Metaburner’s Title and export it as a new file. Then, create a new timeline with the rendered file and copy-paste the title containing all your markers. This approach allows you to perform extraction tasks seamlessly without encountering any issues.
I have verified and ensured that all Notion prerequisites are met and entered correctly. However, Marker Data still shows Failed to upload completely
- Navigate to the
Helpmenu and selectOpen Logs. - Open the log file
csv2notion-neo_log.txt. - Scroll down to review the most recent entries.
If you encounter repeated 500 Server Error or 429 Client Error: Too Many Requests messages, first try smaller batches as described under
Occasionally, Marker Data's Notion module may become non-functional when Notion updates its APIs.
If you encounter such a problem, please open an issue. With time and thorough investigation, we will release an update for Marker Data. However, the update may not be immediate, as it depends on our availability to analyse and resolve the issue. We appreciate your patience and understanding.
I have verified and ensured that all Airtable prerequisites are met and entered correctly. However, Marker Data still shows Failed to upload completely
- Navigate to the
Helpmenu and selectOpen Logs. - Open the log file
airlift_log.txt. - Scroll down to review the most recent entries.
If you observe authentication or permission errors, reconfirm your Airtable Token, Base ID, and Table ID, and ensure that your Dropbox refresh token and app scopes remain valid. For detailed instructions, please refer to the Airtable Prerequisite and Dropbox Prerequisite documentation. Also check Airtable’s status and Dropbox’s status should uploads suddenly fail despite correct credentials.
Occasionally, Marker Data's Airtable module may become non-functional when Airtable or Dropbox updates its APIs.
If you encounter such a problem, please open an issue. With time and thorough investigation, we will release an update for Marker Data. However, the update may not be immediate, as it depends on our availability to analyse and resolve the issue. We appreciate your patience and understanding.
Couldn’t create or rename a configuration
Named configurations must be unique. If a configuration with the same name already exists, Marker Data will not overwrite it and will show an alert.
Choose a different name. The built-in Default configuration cannot be saved as a named file, renamed, or deleted.
See Configurations.
Notifications do not appear
Under General → Notifications:
- Confirm
Notification Frequencyis not set toNever. - Allow notifications for Marker Data in macOS System Settings → Notifications.
- When Marker Data is the frontmost application, banners may be less obvious — check Notification Centre.
Dock progress ring does not show
Enable Show Progress on Dock Icon under General → Notifications. Progress appears only while an extraction or upload is running.
Clean Cache — when should I use it?
File → Show Cache reveals the temporary staging folder under Movies/Marker Data Cache. File → Clean Cache (⌘ K) empties that folder only.
Use Clean Cache if temporary files have accumulated after many Final Cut Pro drops, Workflow Extension handoffs, or Share Destination exports. It does not delete preferences, Configurations, Database Profiles, Logs, or your Export Destination.
Info
Cache files may be named like FCP Drop-… or WorkflowExtensionExport.fcpxml. Your extract folders under Export Destination still use the project or timeline name — not the temporary cache filename.
Pagemaker will not open or will not load my Data Set
Open Pagemaker via File → Open Pagemaker (⌘ P), or use the Open Pagemaker button after a Notion or Airtable extraction completes.
Pagemaker expects a Notion or Airtable extract folder containing the JSON manifest and related media. Drag that folder onto the Pagemaker drop zone, or choose the folder with ⌘ O. CSV- or Excel-only extracts are not suitable for Pagemaker.
An internet connection is required to load the Pagemaker interface; Data Set processing remains local. See Pagemaker and Creating PDF.
Library folders failed to initialise
On first launch, Marker Data creates its Application Support folders (preferences, Configurations, Database Profiles, Logs) and the Movies cache folder. If you see Failed to initialize all Library folders, free disk space, then quit and reopen Marker Data.
If the alert persists, contact support with a description of your macOS version and install location.
Module Status
To streamline our internal testing process, we have implemented an automated daily validation of Marker Data’s modules.
| Modules | Status | Platform Status | Schedule |
|---|---|---|---|
| Notion |  |
Notion Status | Scheduled daily at 8:00 AM Singapore time |
| Airtable |  |
Airtable Status | Scheduled daily at 8:00 AM Singapore time |
If the badge is green, indicating a successful test, it confirms that our modules are compatible with the supported database platforms. However, if the badge turns red, signalling a failure, an update may be necessary to ensure continued compatibility. In the event of a failure, we also recommend checking the platform's status page to rule out any ongoing outages or service disruptions.