#
Generating Markers

Users interested in procedural Marker extraction can take advantage of the Marker Toolbox, which offers capabilities for inserting and manipulating Markers. When combined with Marker Data and modern chat-based models, this setup enables a cohesive, end-to-end workflow for both programmatic generation and extraction of Markers. Although a generative approach to Marker extraction was initially explored, it was ultimately considered too specialised for inclusion in Marker Data's roadmap.
#
CSV Profile
- Create Your CSV Profile.
Info
You can also use TSV, Excel, Notion or Airtable Profile.
#
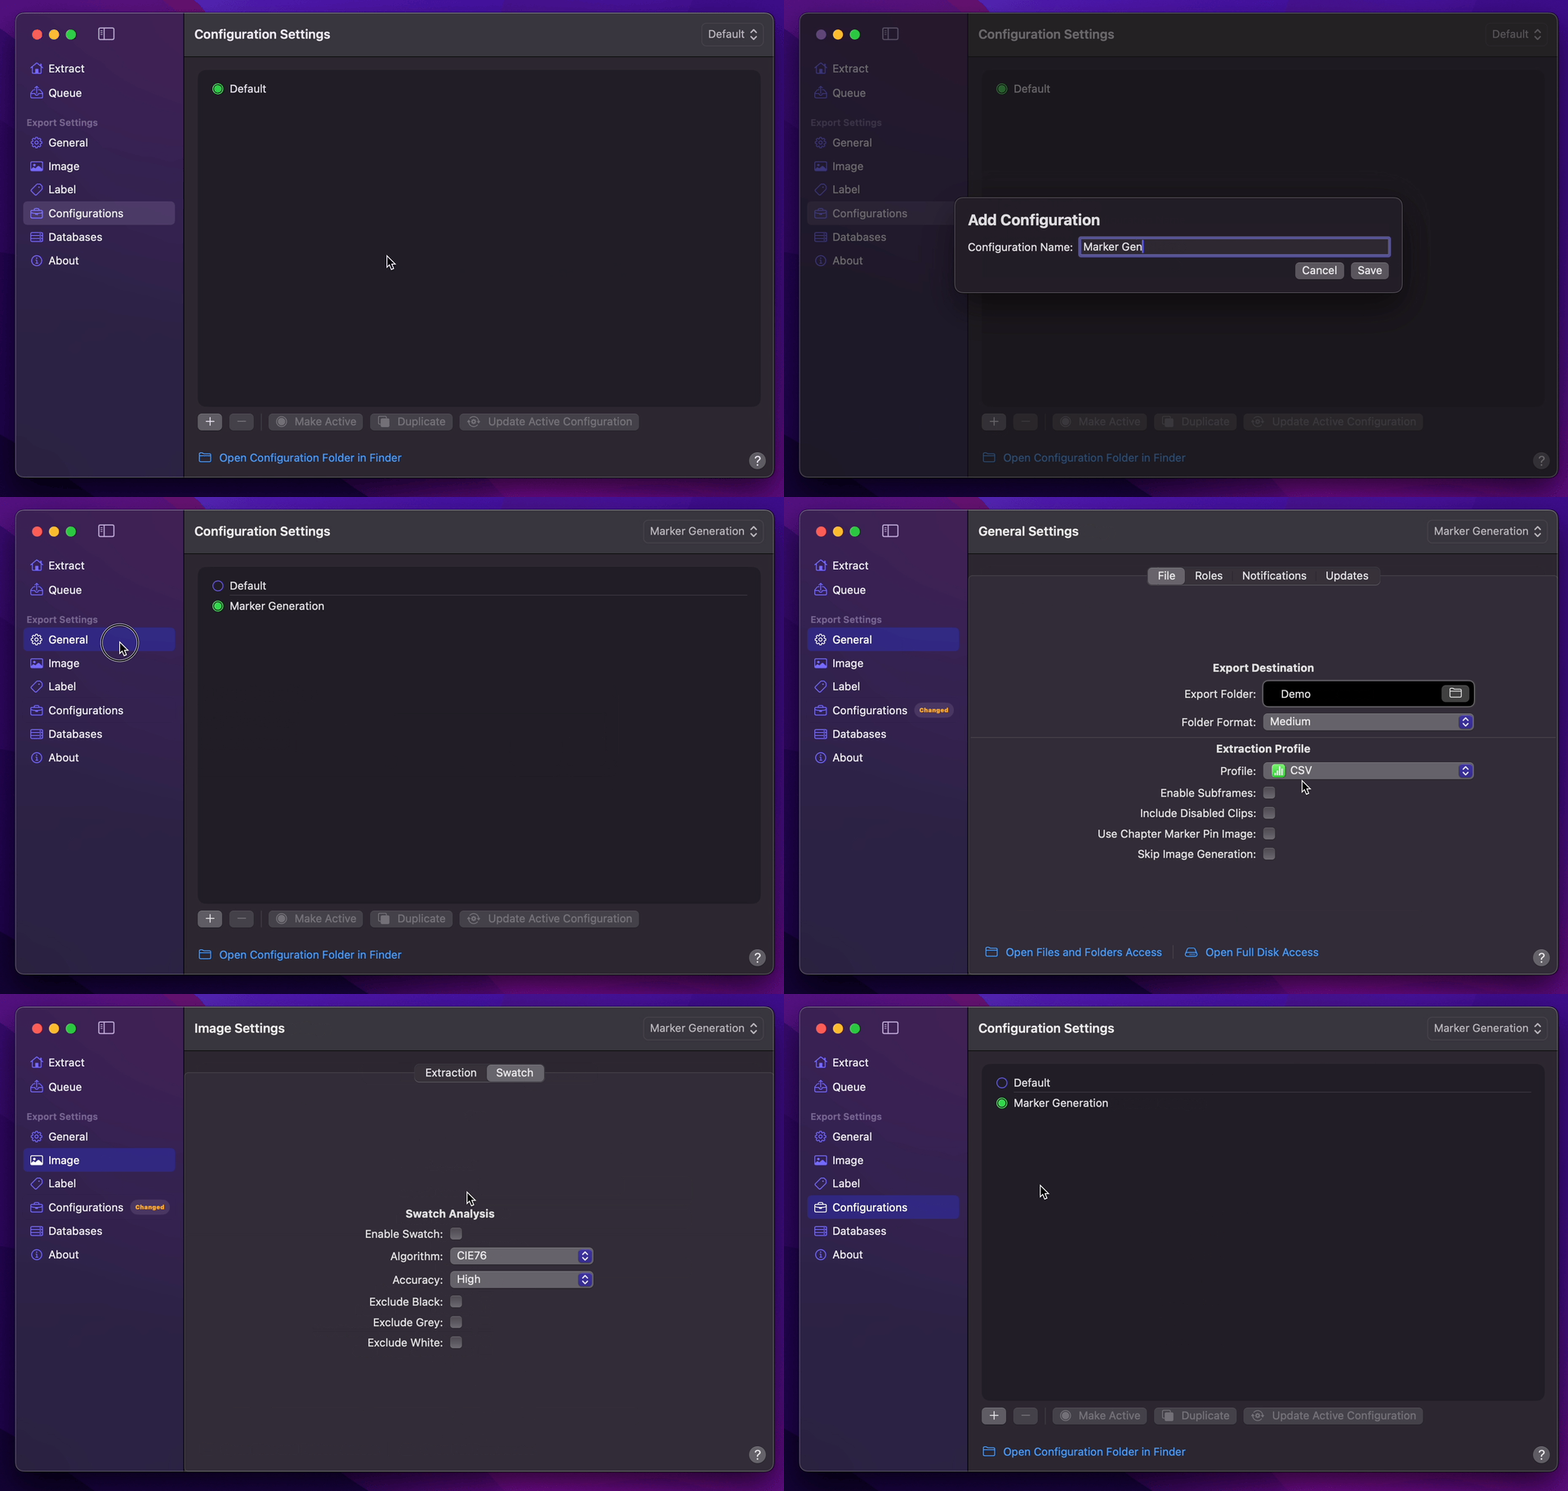
Configuration Setup

- Create Your Configuration.
- You can select your desired Export Destination by clicking on the Folder Icon.
- You can select
CSVas your Extraction Profile. - You can set Image Format to
PNG. - Enable Swatch (Optional).
- Select your desired Overlays (Optional).
- Return back to Configurations to Update Active Configuration
#
Count Mode
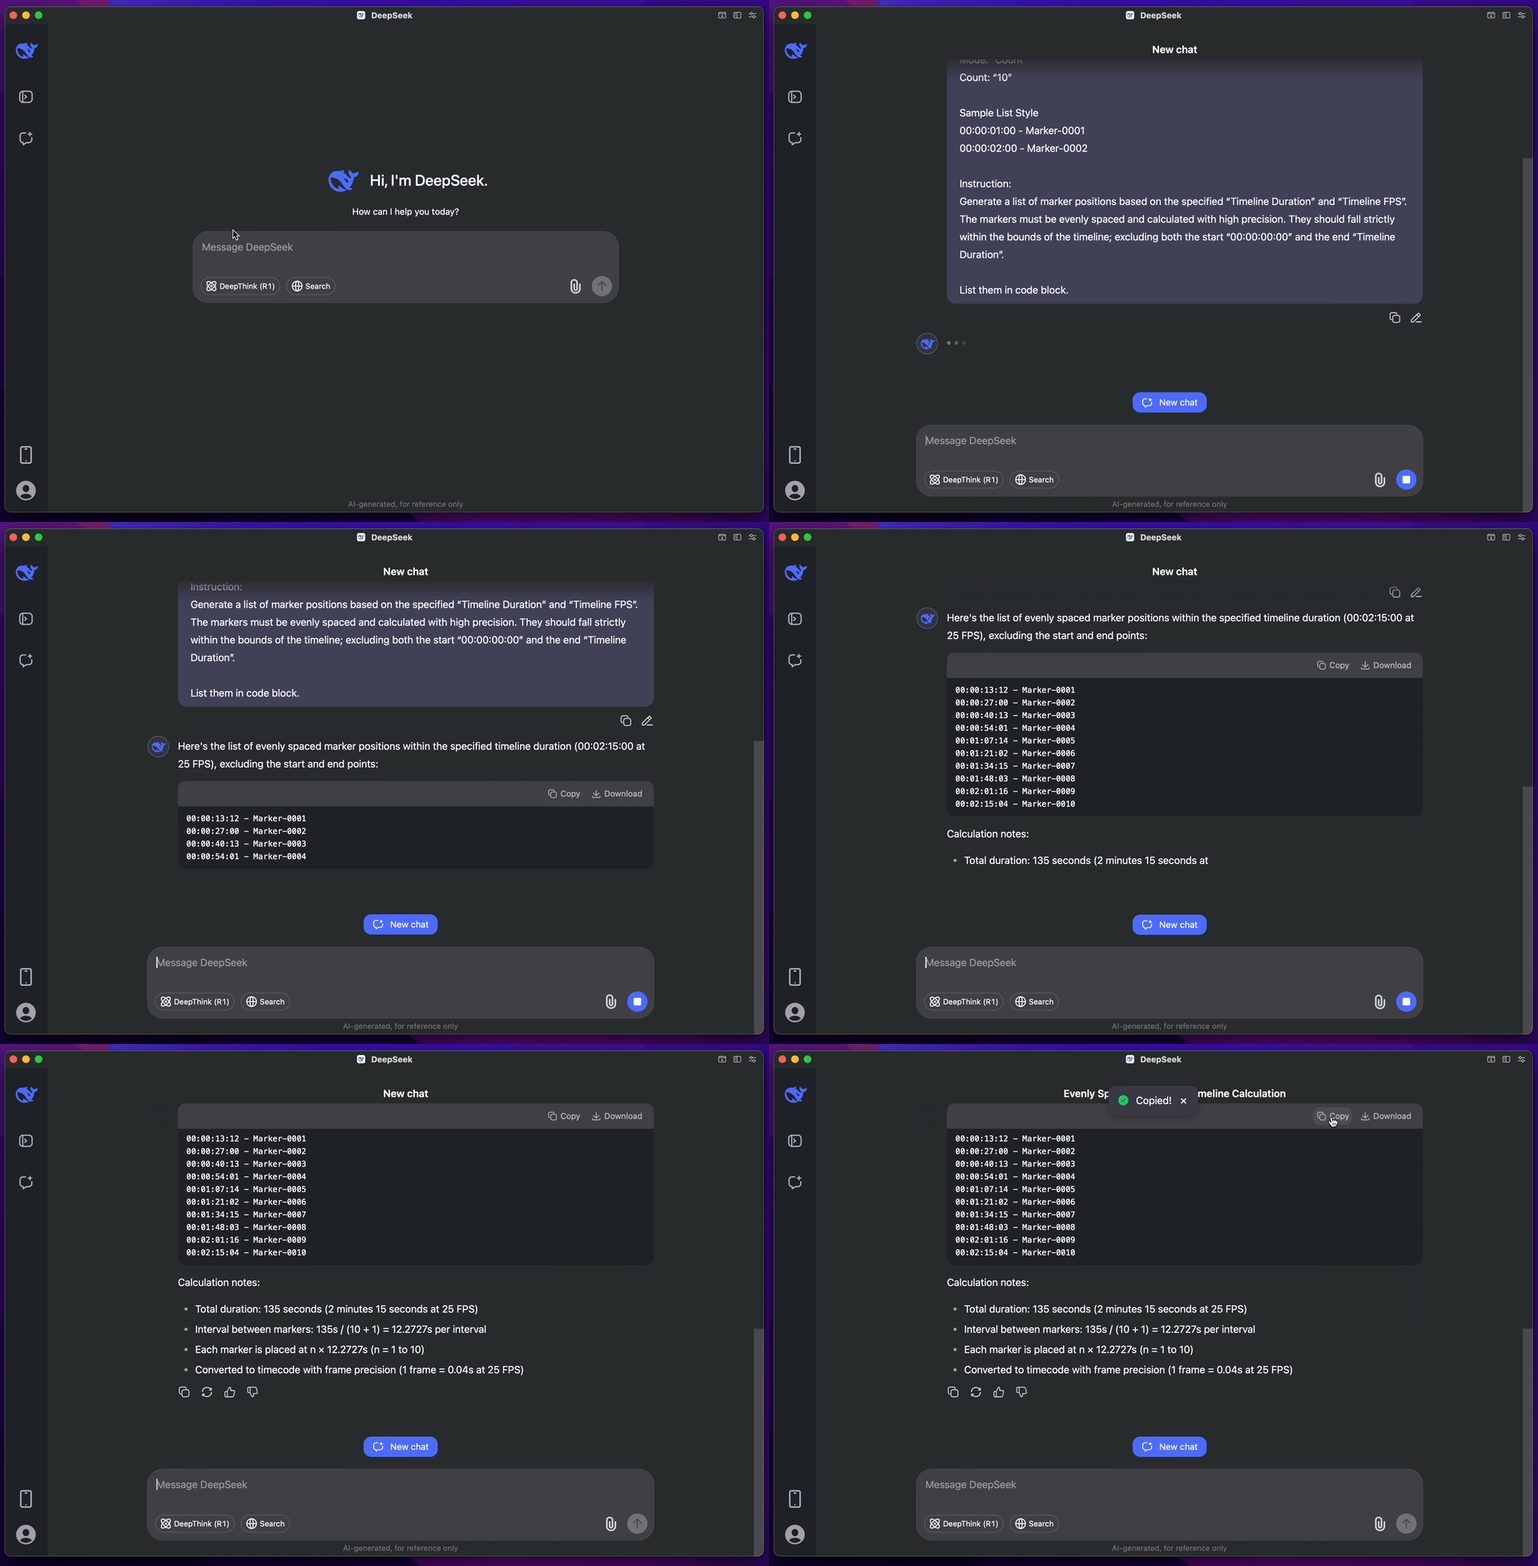
Below is a refined AI prompt template for use with Count Mode. You may input it into your preferred language model, such as ChatGPT, Claude, or DeepSeek. Please ensure that the Timeline Duration and Timeline FPS values match your timeline’s total duration and frame rate. You may also customise the Marker Prefix, Marker Name Zero Padding, and Count values according to your specific requirements.
#
AI Prompt Template
Timeline Duration: “00:02:15:00”
Timeline FPS: “25p”
Marker Prefix: “Marker”
Marker Name Zero Padding: “4”
NLE: “Final Cut Pro”
Mode: “Count”
Count: “10”

Sample List Style
00:00:01:00 - Marker-0001
00:00:02:00 - Marker-0002

Instruction:
Generate a list of marker positions based on the specified “Timeline Duration” and “Timeline FPS”.
The markers must be evenly spaced and calculated with high precision.
They should fall strictly within the bounds of the timeline; excluding both the start “00:00:00:00” and the end “Timeline Duration”.

List them in code block.
Info
DeekSeek is used for this demonstration.

- Click the
Extensionsbutton on the left side of Final Cut Pro’s toolbar. - Select
Marker Toolboxfrom theExtensionsmenu. - Click
Settingsand ensure that your frame rate matches the timeline frame rate in Final Cut Pro. - Ensure you have clicked
Copiedfrom DeepSeek’s code block. - In
Marker Toolbox, clickPaste, then clickProcess Comments Locally. Adjust any Marker's timecode if needed. - Click the
Greenbutton to drag and drop theCompound Clipinto your timeline. - Make sure the
Compound Clipis aligned with the start of the timeline. - From Final Cut Pro’s Share menu, select either
Marker Data SourceorMarker Data H.264 - Marker Data will start to perform its task.
- Once the export is complete, save the file to your desired location.
Info
You can use this same technique for the Notion Database Profile, the Airtable Database Profile or even when working with Pagemaker.
#
Interval Mode
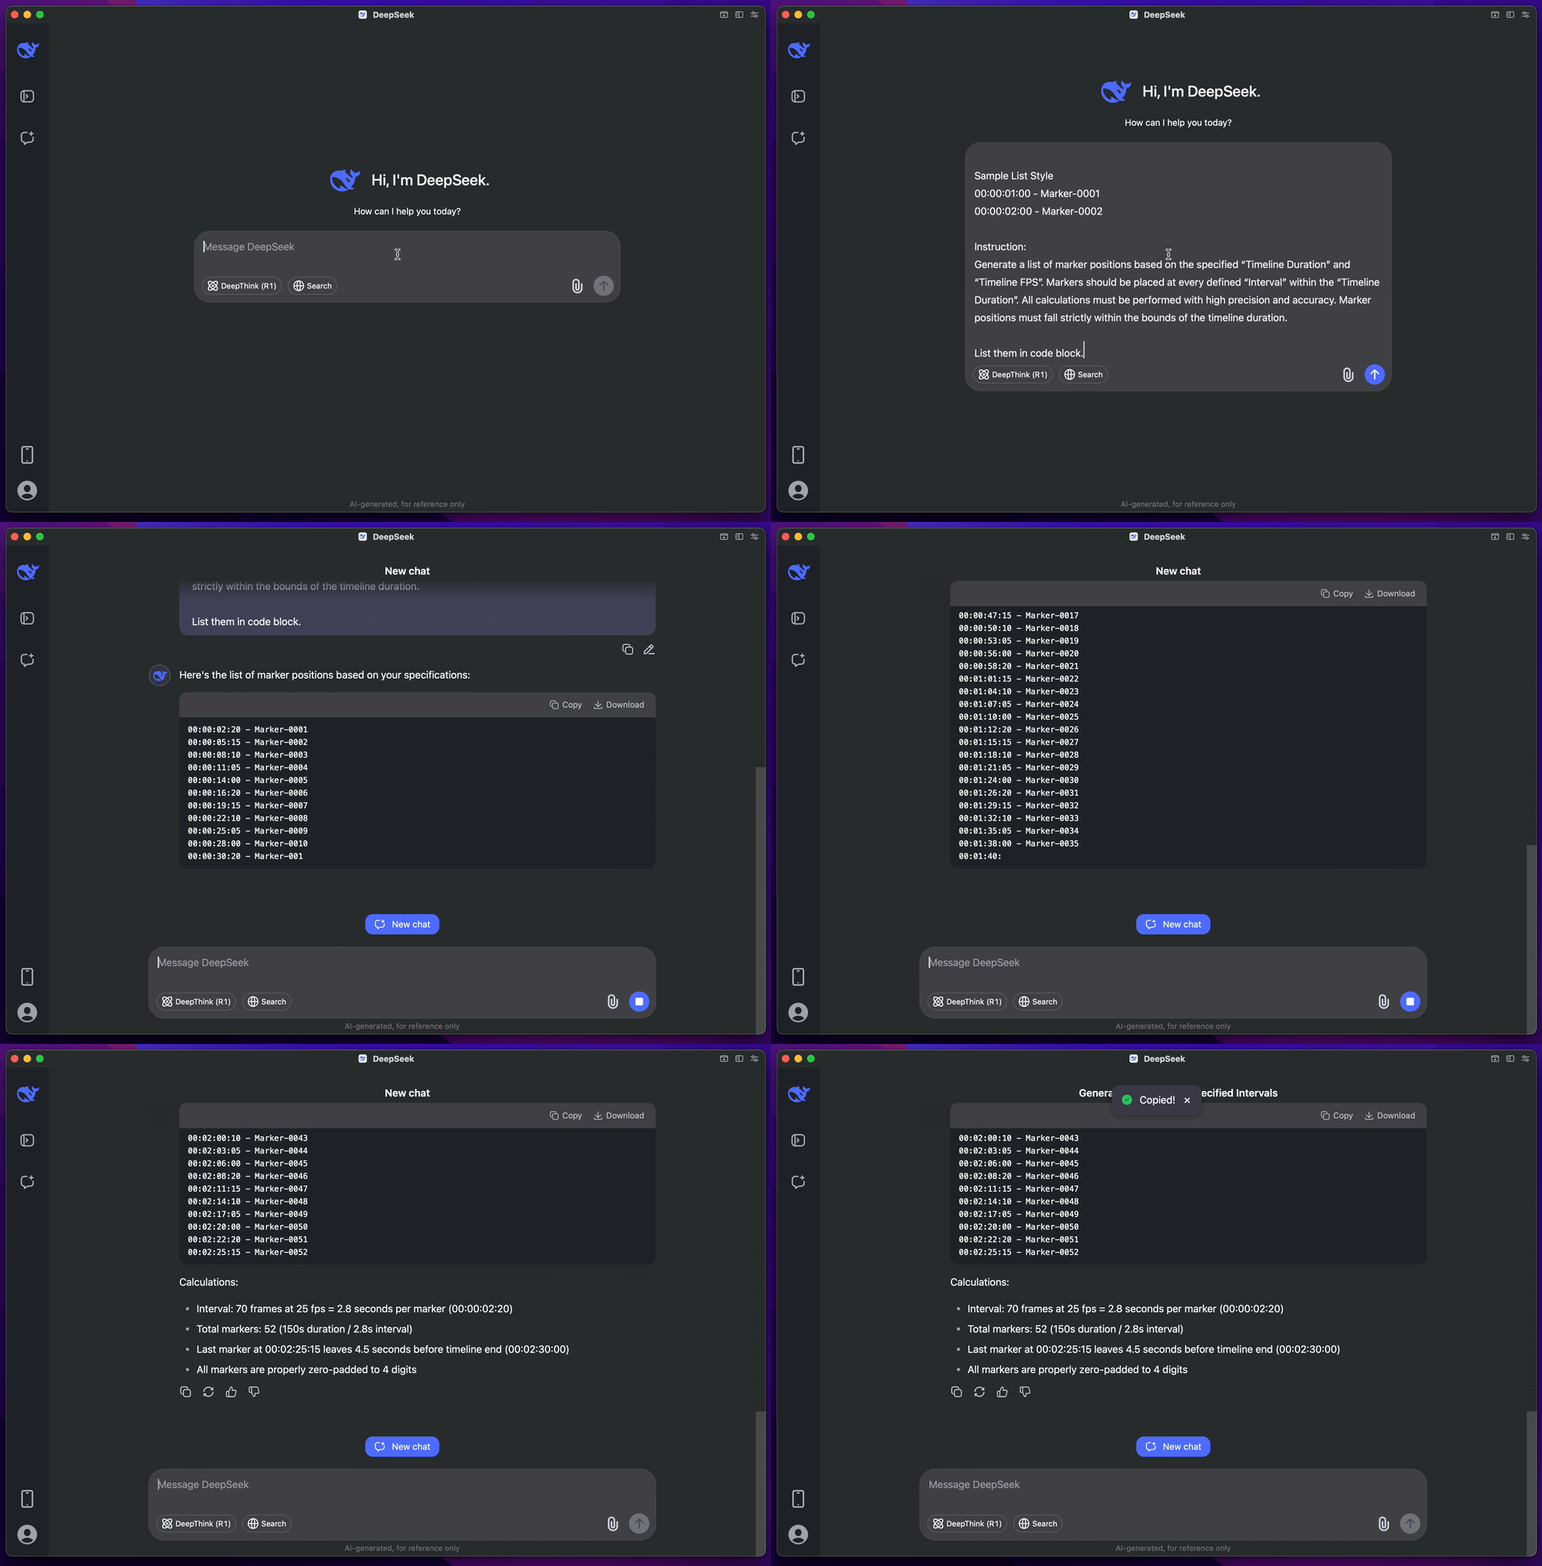
Below is a refined AI prompt template for use with Interval Mode. You may input it into your preferred language model, such as ChatGPT, Claude, or DeepSeek. Please ensure that the Timeline Duration and Timeline FPS values match your timeline’s total duration and frame rate. You may also customise the Marker Prefix, Marker Name Zero Padding, and Interval values according to your specific requirements.
#
AI Prompt Template
Timeline Duration: “00:02:30:00”
Timeline FPS: “25p”
Marker Prefix: “Marker”
Marker Name Zero Padding: “4”
NLE: “Final Cut Pro”
Mode: “Interval”
Interval: “70 Frames”

Sample List Style
00:00:01:00 - Marker-0001
00:00:02:00 - Marker-0002

Instruction:
Generate a list of marker positions based on the specified “Timeline Duration” and “Timeline FPS”.
Markers should be placed at every defined “Interval” within the “Timeline Duration”.
All calculations must be performed with high precision and accuracy. Marker positions must fall strictly within the bounds of the timeline duration.

List them in code block.
Info
DeekSeek is used for this demonstration.

- Click the
Extensionsbutton on the left side of Final Cut Pro’s toolbar. - Select
Marker Toolboxfrom theExtensionsmenu. - Click
Settingsand ensure that your frame rate matches the timeline frame rate in Final Cut Pro. - Ensure you have clicked
Copiedfrom DeepSeek’s code block. - In
Marker Toolbox, clickPaste, then clickProcess Comments Locally. Adjust any Marker's timecode if needed. - Click the
Greenbutton to drag and drop theCompound Clipinto your timeline. - Make sure the
Compound Clipis aligned with the start of the timeline. - From Final Cut Pro’s Share menu, select either
Marker Data SourceorMarker Data H.264 - Marker Data will start to perform its task.
- Once the export is complete, save the file to your desired location.
Info
You can use this same technique for the Notion Database Profile, the Airtable Database Profile or even when working with Pagemaker.
#
Afterthoughts
The procedural workflow for Marker extraction and generation opens up a range of compelling use cases. One notable example is the archival of timelines—such as those found in video editing, animation, or narrative design workflows—where users may wish to capture still frames or key moments along the timeline. These snapshots can then be compiled into structured documents using Pagemaker, enabling the creation of rich, navigable PDFs that serve as comprehensive visual records.
What makes this workflow particularly powerful is its compatibility with large language models (LLMs). By integrating chat-based models into the pipeline, users can generate sophisticated Marker placement patterns automatically.
